Interface tour
The panel has six parts, top to bottom.
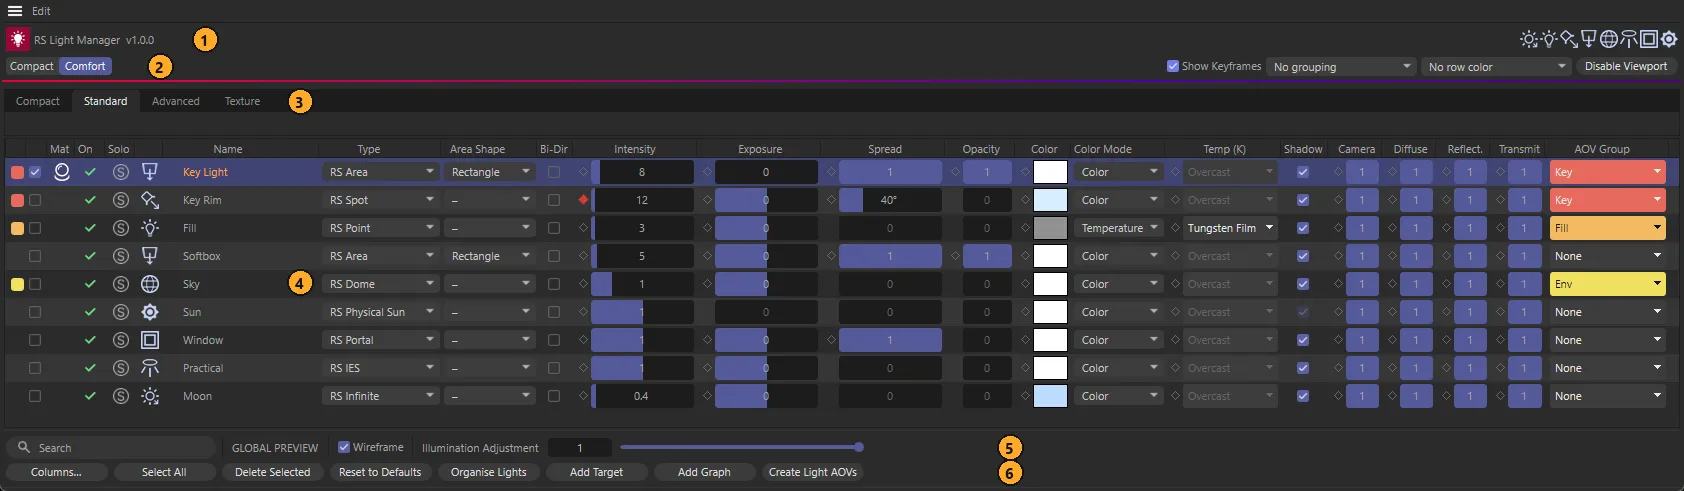
| # | Part | What it is for |
|---|---|---|
| 1 | Header | Plugin icon (your licence), title and version, and a button to create each light type |
| 2 | View bar | Row density, Show Keyframes, Group by, Row colour, and Disable / Enable Viewport |
| 3 | Tabs | Compact, Standard, Advanced, Texture — which columns the table shows |
| 4 | Light table | One row per Redshift light |
| 5 | Search and Global Preview | Filter the rows by name; viewport preview controls for every light |
| 6 | Action bar | Columns…, selection, delete, reset, organise, targets, light materials, AOVs |
The panel’s menu bar has Edit ▸ Preferences… (see Preferences) and Edit ▸ License… (see Licensing & support).
1. Header
Section titled “1. Header”
- Plugin icon (left) — opens your licence. Same as Edit ▸ License….
- Light-type icons (right) — one each for RS Infinite, Point, Spot, Area, Dome, IES, Portal and Physical Sun. Click one to add that light to the scene; hover to see which is which. See Creating & organising lights.
2. View bar
Section titled “2. View bar”| Control | What it does |
|---|---|
| Compact / Comfort | Row height. Compact fits more lights on screen; Comfort gives taller rows that are easier to hit. Remembered between sessions. |
| Show Keyframes | Shows or hides the key diamonds at the left of value cells. With them hidden you can’t set keys from the table. See Keyframes & takes. |
| Group by | No grouping, Group by Type, Group by Layer, Group by Light Group or Group by Take. See Search, grouping & solo. |
| Row colour | No row color, Color by Layer or Color by Light Group — tints each row with its layer’s or light group’s colour. |
| Disable Viewport / Enable Viewport | Hides every Redshift light in the editor viewport, or shows them all again. Rendering is not affected. |

3. Tabs
Section titled “3. Tabs”Each tab shows a different set of columns over the same lights:
- Compact — the essentials: intensity, exposure and spread.
- Standard — adds colour, temperature, shadow, the main contribution values and the light group.
- Advanced — every light column, including shadow detail, sampling, scattering, toon and caustics.
- Texture — intensity, exposure, colour and the texture or environment.
Hide the columns you don’t use with Columns…. See Tabs & columns.
4. Light table
Section titled “4. Light table”One row per Redshift light in the active document. Rows are read live from the scene, so a change made in the Attribute Manager shows in the table straight away, and the other way round.
- Selecting rows selects the lights in the Object Manager, and selecting lights in the Object Manager highlights their rows.
- Editing a value on a selected row changes the same value on every selected light.
- Cells that don’t apply to a light — Exposure on a Physical Sun, for example — are greyed out.
When the scene has no Redshift lights, the table says so and points you to the light icons.
See Editing values for every way to change a value.
5. Search and Global Preview
Section titled “5. Search and Global Preview”
- Search — type part of a light’s name to show only the matching rows. Clear the field to show every light again.
- GLOBAL PREVIEW — viewport-only controls that apply to every Redshift light at once:
- Wireframe — turns Redshift’s viewport illumination display on or off for every light except Dome lights.
- Illumination Adjustment — scales the brightness of the lights’ viewport preview, from 0 to 1. It does not change render values and is not recorded for undo.
6. Action bar
Section titled “6. Action bar”| Button | What it does |
|---|---|
| Columns… | Choose which columns this tab shows. See Tabs & columns. |
| Select All / Deselect All | Selects every Redshift light, or clears the selection. |
| Delete Selected | Deletes the selected lights after you confirm. Undoable. |
| Reset to Defaults | Resets the selected lights’ values to their type’s defaults. |
| Organise Lights | Moves every Redshift light under one labelled null, sorted by type. |
| Add Target | Adds target nulls so the selected lights aim at them. |
| Add Graph | Gives the selected lights an RS Light Material. See Light material graphs. |
| Create Light AOVs / Update Light AOVs | Creates or updates Light Group AOVs. See Light Group AOVs. |
Delete Selected, Reset to Defaults, Organise Lights and Add Target are covered in Creating & organising lights.
Panel width
Section titled “Panel width”On Windows, a floating panel resizes to the narrowest width that shows the current tab’s columns whenever you switch tab or change the columns. Turn this off in Preferences (Fit floating panel width to each tab). A docked panel keeps the width of its dock, and on macOS the panel is never resized for you.
Within the table, Intensity, Exposure, Spread and the texture field share whatever width is left over, so widening the panel gives their sliders more room.